D-Link DSM-G600 Installation
|
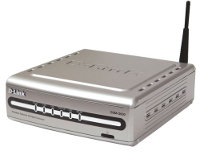
This document describes in depth how to prepare your D-Link DSM-G600 for installing NetBSD/sandpoint. Be aware that there are two revisions of the G600, which look very similar:
NetBSD/sandpoint runs on the B revisions only. You can determine
the revision by looking on the sticker at the left side of the
case, where you should find a line starting with:
|
|
We need a serial console to get access to the firmware. That includes soldering a four-wire ribbon cable and building (or buying) a serial adapter from the G600's TTL levels to RS232 levels.
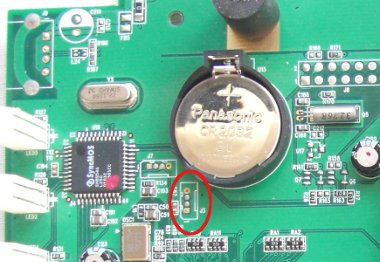
Look out for a connector labeled J3, near the battery.
You will usually see four unpopulated pads there. On a few boards
there is already a connector socket mounted, but it is hard to find the
appropriate plug.
When there is no socket at J3 I would suggest to
solder a 4-wire ribbon cable to the pads. Use the red wire to indicate
pin 1. You may attach a plug on the other end of the cable, which can
be used to connect it to an external serial level shifter circuit.
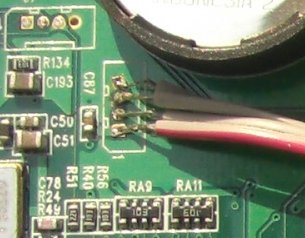
Otherwise you have to find a matching plug for the socket and connect the serial cable to it. Or desolder the socket.
The serial port on the D-Link DSM-G600 is using 3.3V TTL levels, which have to be converted into regular RS232 levels by a level shifter circuit. Instructions how to build such a circuit yourself can be found here:
Make sure that the layout of the connector fits to the pinout of the DSM-G600's serial port, as shown above.
Another option is to buy such a converter. There are solutions for a standard RS232 interface and for an USB interface. Look out for:
- RS232 level shifter / breakout board (MAX3232 based)
- USB to TLL serial level shifter / breakout board (FT232 based)
Now you can connect with any terminal program to the DSM-G600's
serial console. The easiest approach may be to use NetBSD's
tip(1) command to make a direct console
connection at 9600bps.
# tip console
Note that when using a serial connection via USB you may have to
make an entry for /dev/ttyU0 in
/etc/remote.
The altboot(8) program functions as a bridge between
the U-Boot firmware and the NetBSD kernel startup environment.
NAS firmware often provides no means to boot a kernel from disk or
from the network and doesn't initialize all hardware correctly.
We will also use it to pass a bootinfo list to the kernel.
The altboot boot loader has to be loaded and started
using the DSM-G600's firmware, which is U-Boot 0.2.0.
U-Boot 0.2.0 (May 26 2005 - 19:38:32)

CPU:   MPC8245 V1.2 at 170.503 MHz:
Board: Sandpoint 8245
DRAM:  32 MB
FLASH: FUJI_DL323BE
In:    serial
Out:   serial
Err:   serial
Hit any key to stop autoboot:  0
D-Link's U-Boot version is extremely restricted. Probably to keep it
small and to save space for a Linux kernel and ramdisk in the 4MB Flash,
but also to keep the user from hacking it.
It does not allow any file transfer besides replacing the Linux
kernel image with another Linux kernel image, and it doesn't have
network support either. We can use altboot(8)
to overcome all those restrictions.
The only way to install, or even run, altboot is to make it look like a Linux kernel U-Boot image and let the firmware boot it instead of Linux. So this step will overwrite your Linux installation.
To replace the Linux kernel in the Flash ROM we can use the U-Boot
command loadb k. This will expect an U-Boot image
file to be transfered over the serial port using
Kermit protocol.
So the next step is to install kermit(1) from
pkgsrc(7), or to compile and install it yourself.
To configure Kermit for the file transfer you have to provide the
following commands:
set line /dev/tty00
set speed 9600
set carrier-watch off
set flow-control none
robust
set file type bin
For convenience you can write them into a file which you can pass as an argument to kermit.
Run Kermit and start your DSM-G600. Quickly press a key to prevent autobooting. Then type loadb k to start the file transfer:
=> loadb k
## Ready for binary (kermit) download ...
At this point you have to return to Kermit's command mode by typing
CTRL-\ followed by c.
We have to send the file altboot.img, which is
our bootloader in U-Boot image format, faking a Linux kernel.
C-Kermit>send /local/path/to/altboot.img
The transfer may take a few minutes at 9600 bps. When done, let Kermit reconnect to the NAS by entering c. You will see the following output:
## Total Size      = 0x000132dc = 78556 Bytes
## Start Addr      = 0x00100000
Un-Protect Flash Bank # 1
Erase Kernel from 0xfff10000 to 0xffffffff ... done
Erased 15 sectors
Kernel Size = 78556
Copy to Flash... done
Protect Flash Bank # 1
U-Boot always runs bootm FFF10000 FFC20000 and
there is no way to change that. So it may be convenient to replace the
RAMDisk image at 0xffc20000 by an empty U-Boot image,
like this one (do not forget to
uncompress it with gunzip(1)). Or use
mkubootimage to make your own dummy.
Write this image to Flash, as shown above, by entering the command
loadb r.
Now you can use altboot to launch the
netbsd-INSTALL kernel for installing NetBSD.
You may choose to load it with TFTP or from NFS. For TFTP you have
to enable tftpd(8) in
/etc/inetd.conf, and for NFS there is a
documentation at
The Network File System. But in both cases you
have to set up a DHCP server, which is explained in the
DHCP Howto
. An appropriate dhcpd.conf entry could
look like this:
        host dsmg600 {
                hardware ethernet 00:13:46:xx:xx:xx;
                fixed-address 192.168.0.103;
                next-server 192.168.0.1;
                option root-path "/export/dsmg600/root";
        }
The root-path option is only needed when using NFS and
should match your exported NFS directory.
Uncompress netbsd-INSTALL.gz from the
NetBSD/sandpoint distribution and copy it into the NFS or TFTP
directory. Reboot or power-cycle your DSM-G600.
When altboot starts press a key within two seconds
to enter interactive mode.
## Booting image at fff10000 ...
   Image Name:   altboot
   Image Type:   PowerPC Linux Kernel Image (unknown compression)
   Data Size:    76444 Bytes = 74.7 kB
   Load Address: 01000000
   Entry Point:  01000000
 Verifying Checksum ... OK
OK
## Loading RAMDisk Image at ffc20000 ...
   Image Name:   dummy
   Image Type:   PowerPC Linux RAMDisk Image (unknown compression)
   Data Size:    0 Bytes =  0 kB
   Load Address: 01f00000
   Entry Point:  01f00000
   Verifying Checksum ... OK
   Loading Ramdisk to 01f2f000, end 01f2f000 ... OK

>> NetBSD/sandpoint altboot, revision 1.7 (Sat Apr  9 21:38:08 CEST 2011)
>> D-Link DSM-G600, cpu 198 MHz, bus 99 MHz, 32MB SDRAM
channel 0 present
wd0: <WDC WD800BB-00JHC0> DMA LBA 76319 MB
wd0: no disklabel
MAC address 00:13:46:xx:xx:xx
100Mbps-FDX
Hit any key to enter interactive mode: 2
bootargs>
Now you can boot the installation kernel from TFTP with
bootargs> tftp:netbsd-INSTALL
or from NFS:
bootargs> nfs:netbsd-INSTALL
Our bootloader configures the hardware, determines the IP address, loads the kernel via network and launches it:
loading "netbsd-INSTALL" 5100772+110412=0x4f88b0
entry=0x00090000, ssym=0x00588430, esym=0x005888b0
Copyright (c) 1996, 1997, 1998, 1999, 2000, 2001, 2002, 2003, 2004, 2005,
    2006, 2007, 2008, 2009, 2010, 2011
    The NetBSD Foundation, Inc.  All rights reserved.
Copyright (c) 1982, 1986, 1989, 1991, 1993
    The Regents of the University of California.  All rights reserved.

NetBSD 5.99.48 (INSTALL) #9: Sat Mar 26 20:14:10 CET 2011
	frank@compaq.owl.de:/home/frank/netbsd/current/src/sys/arch/sandpoint/compile/obj/INSTALL
total memory = 32768 KB
avail memory = 26136 KB
OpenPIC Version 1.2: Supports 1 CPUs and 26 interrupt sources.
mainbus0 (root)
cpu0 at mainbus0: 8245 (Revision 0.4), ID 0 (primary)
cpu0: HID0 0x90c000<DOZE,DPM,ICE,DCE>, powersave: 1
eumb0 at mainbus0
com0 at eumb0 unit 0: ns16550a, working fifo
com0: console
com0: interrupting at irq 40
ociic0 at eumb0
iic0 at ociic0: I2C bus
strtc0 at iic0 addr 0x68: M41T8x Real-time Clock
satmgr0 at eumb0 unit 1: button manager (dlink)
satmgr0: interrupting at irq 41
pci0 at mainbus0 bus 0
pchb0 at pci0 dev 0 function 0
pchb0: vendor 0x1057 product 0x0006 (rev. 0x12)
ral0 at pci0 dev 13 function 0: vendor 0x1814 product 0x0201 (rev. 0x01)
ral0: interrupting at irq 16
ral0: 802.11 address 00:0f:a3:xx:xx:xx
ral0: MAC/BBP RT2560 (rev 0x04), RF RT2525
ral0: 11b rates: 1Mbps 2Mbps 5.5Mbps 11Mbps
ral0: 11g rates: 1Mbps 2Mbps 5.5Mbps 11Mbps 6Mbps 9Mbps 12Mbps 18Mbps 24Mbps 36Mbps 48Mbps 54Mbps
ohci0 at pci0 dev 14 function 0: vendor 0x1033 product 0x0035 (rev. 0x43)
ohci0: interrupting at irq 17
ohci0: OHCI version 1.0, legacy support
usb0 at ohci0: USB revision 1.0
ohci1 at pci0 dev 14 function 1: vendor 0x1033 product 0x0035 (rev. 0x43)
ohci1: interrupting at irq 17
ohci1: OHCI version 1.0, legacy support
usb1 at ohci1: USB revision 1.0
ehci0 at pci0 dev 14 function 2: vendor 0x1033 product 0x00e0 (rev. 0x04)
ehci0: interrupting at irq 18
ehci0: companion controllers, 3 ports each: ohci0 ohci1
usb2 at ehci0: USB revision 2.0
stge0 at pci0 dev 15 function 0: Sundance ST-1023 Gigabit Ethernet, rev. 65
stge0: interrupting at irq 19
stge0: Ethernet address 00:13:46:xx:xx:xx
ukphy0 at stge0 phy 24: OUI 0x0009c3, model 0x0008, rev. 0
ukphy0: 10baseT, 10baseT-FDX, 100baseTX, 100baseTX-FDX, 1000baseT, 1000baseT-FDX, auto
acardide0 at pci0 dev 16 function 0: Acard ATP865 Ultra133 IDE Controller (rev. 0x10)
acardide0: using irq 20 for native-PCI interrupt
atabus0 at acardide0 channel 0
atabus1 at acardide0 channel 1
biomask 80000f8 netmask 80000f8 ttymask 80000f8
uhub0 at usb0: vendor 0x1033 OHCI root hub, class 9/0, rev 1.00/1.00, addr 1
uhub1 at usb1: vendor 0x1033 OHCI root hub, class 9/0, rev 1.00/1.00, addr 1
uhub2 at usb2: vendor 0x1033 EHCI root hub, class 9/0, rev 2.00/1.00, addr 1
wd0 at atabus0 drive 0
wd0: <WDC WD800BB-00JHC0>
wd0: 76319 MB, 155061 cyl, 16 head, 63 sec, 512 bytes/sect x 156301488 sectors
boot device: stge0
root on md0a dumps on md0b
root file system type: ffs
erase ^H, werase ^W, kill ^U, intr ^C, status ^T
Terminal type? [vt100]
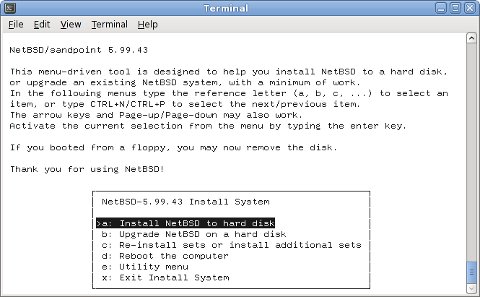
Just follow the usual procedure to install a NetBSD system.
When the installation is finished the system will automatically boot
into multiuser mode, as altboot defaults to boot
wd0a:netbsd. After the network is configured
you can disconnect the serial cable and close the case.
Have fun with your mini NetBSD server!
-
No known method for a hardware reboot or shutdown of the board exists.
Therefore rebooting is simulated by jumping through U-Boot's reset
vector. A
poweroff(8)will just halt the system and flashes the power LED to indicate that it has to be switched off manually.
Back to NetBSD/sandpoint Port Page
